
Wholesale Harley Voltage Regulator: Fitment and Specs by Model
Matching the OEM part number is not enough to guarantee a working charging system.
Correct Harley voltage regulator fitment depends entirely on matching the stator output phase and the connector pinout, not just the visual appearance or the original equipment manufacturer reference code. A mismatch in these electrical characteristics causes immediate short circuits, blown fuses, or permanent stator damage, regardless of how well the unit mounts to the frame.
I learned this lesson the hard way during a rush order for a repair shop in Dubai. The request seemed straightforward: a batch of replacement regulators for a specific model year range. I verified the external housing dimensions and the OEM cross-reference number, assuming compatibility was guaranteed. I did not request photos of the existing connector or confirm the stator phase. When the units arrived, the technicians installed them immediately. Within minutes, every single unit caused the main fuse to blow. Upon inspection, we discovered that while the housing looked identical, the internal pin definition was reversed compared to the wiring harness they were using. The entire batch had to be returned, and the shop faced significant downtime. That incident changed how I approach every inquiry for Harley voltage regulator fitment. Now, before any quote is issued, I require clear images of the stator connector and confirmation of the stator phase. This simple step prevents costly returns and ensures the parts we supply actually work in the field.
Understanding why these mismatches occur requires looking beyond the part number. Many distributors assume that if a regulator fits physically, it will function electrically. This is a dangerous assumption. The evolution of Harley-Davidson charging systems has introduced multiple variations in stator design and wiring harnesses, even within the same model family. Ignoring these differences leads to the kind of failures I witnessed in Dubai. To avoid this, buyers must verify three critical factors: stator output phase, connector type, and model year range. These elements define the true Harley voltage regulator fitment requirements for any given motorcycle.
Why Do Harley Voltage Regulators Fail Immediately After Installation?
Immediate failure is almost always caused by a mismatch in phase count or connector pinout, not a defective component.
When a new regulator blows a fuse or burns out a stator upon installation, the instinct is to blame the quality of the aftermarket part. However, in the vast majority of cases, the part is functioning exactly as designed, but it is connected to an incompatible system. The root cause lies in the electrical architecture of the motorcycle. [NEED_CITE: common causes of charging system failure in V-twin motorcycles]
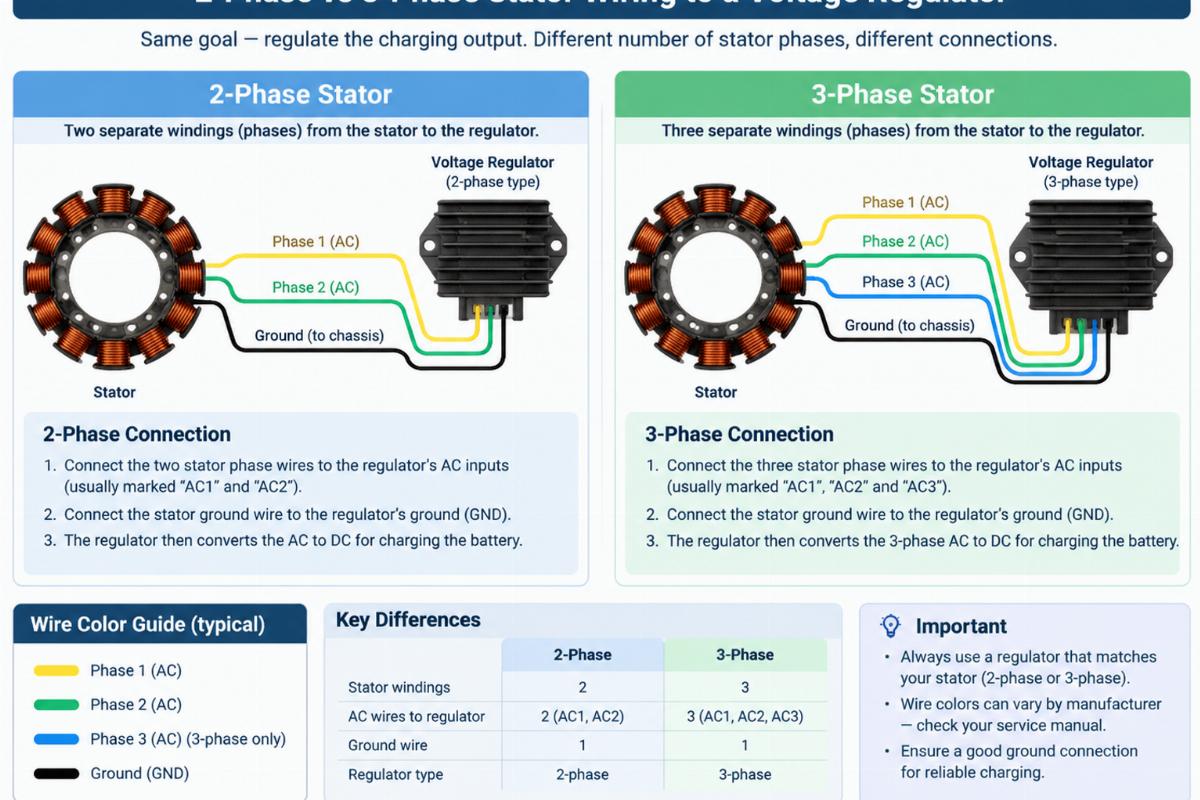
The most frequent error involves confusing two-phase and three-phase stators. Early Evolution engines often used two-phase stators, while later Twin Cam and some late Evolution models switched to three-phase outputs. A regulator designed for a three-phase stator will not correctly rectify the current from a two-phase stator, leading to excessive heat and eventual failure. Conversely, using a two-phase regulator on a three-phase system can cause voltage spikes that damage the battery and other sensitive electronics. This distinction is critical for accurate Harley voltage regulator fitment.
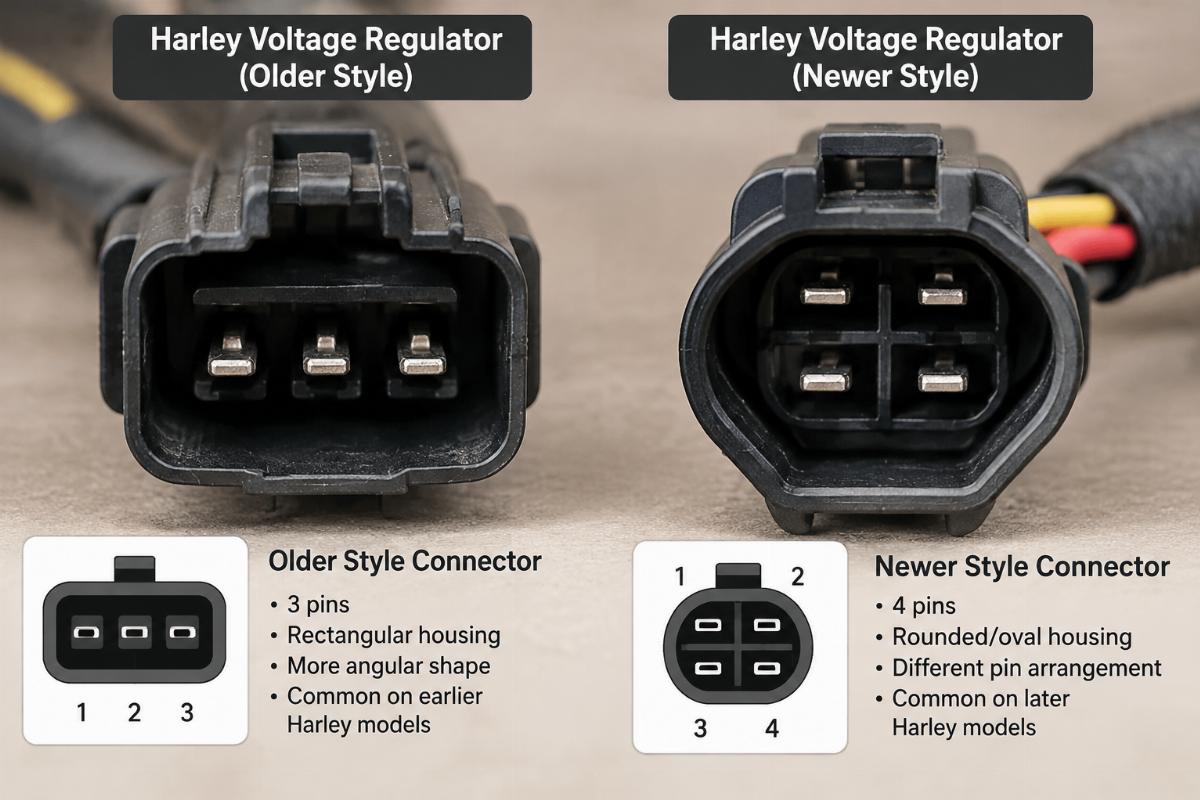
Another common issue is the connector pinout. Even if the plug shape appears similar, the arrangement of the pins inside the connector can vary significantly between model years. For example, a regulator from an early Softail may have a different pin configuration than one from a late-model Dyna, even if both use a similar-looking plastic housing. Plugging in a unit with reversed polarity or swapped signal pins creates a direct short circuit. This is what happened in the Dubai case. The visual similarity masked the electrical incompatibility.
To prevent these issues, always verify the stator phase before ordering. Check the factory service manual for the specific model year to determine whether the stator is two-phase or three-phase. Then, compare the connector on the existing regulator with the one provided by the supplier. If the pin arrangement does not match exactly, do not install it. Proper Harley voltage regulator fitment requires this level of detail.
How to Identify the Correct Regulator for Your Harley Model?
Check the stator phase, connector type, and model year range before placing an order.
Identifying the correct regulator requires a systematic approach that goes beyond simply reading the part number off the old unit. Part numbers can be superseded, mislabeled, or ambiguous. Instead, rely on physical and electrical characteristics that are unique to your motorcycle’s charging system. This method ensures accurate Harley voltage regulator fitment and reduces the risk of receiving incompatible parts.
First, determine the stator output phase. Remove the side cover or access panel to inspect the stator connector. Count the number of wires leading from the stator to the regulator. A two-phase stator will typically have two AC output wires, while a three-phase stator will have three. This information is often listed in the factory service manual under the charging system section. [NEED_CITE: Harley-Davidson factory service manual charging system specifications]
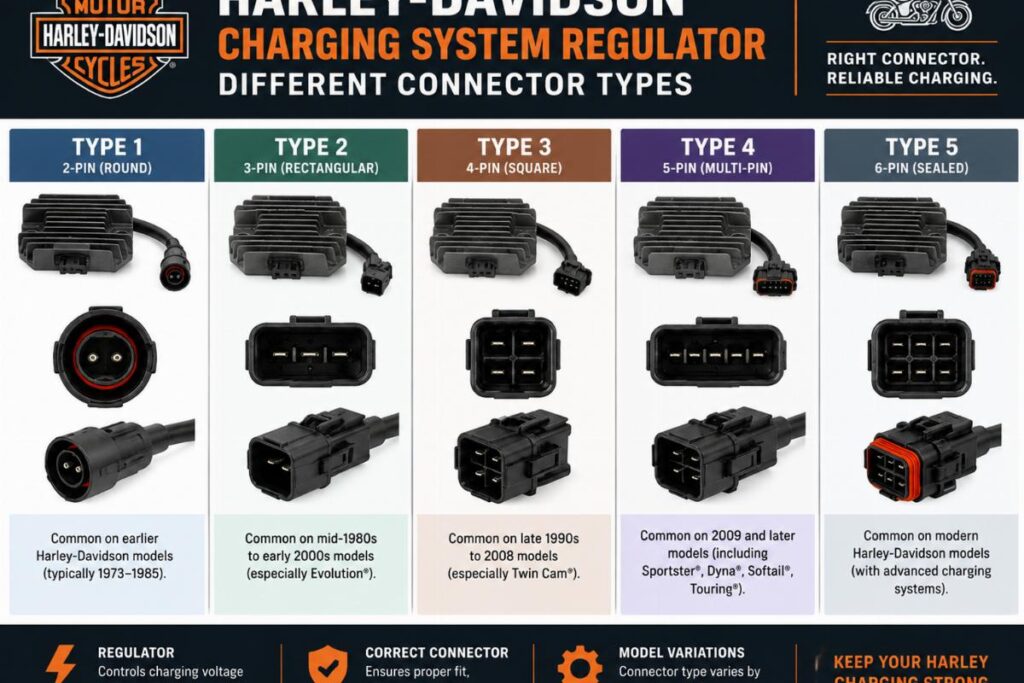
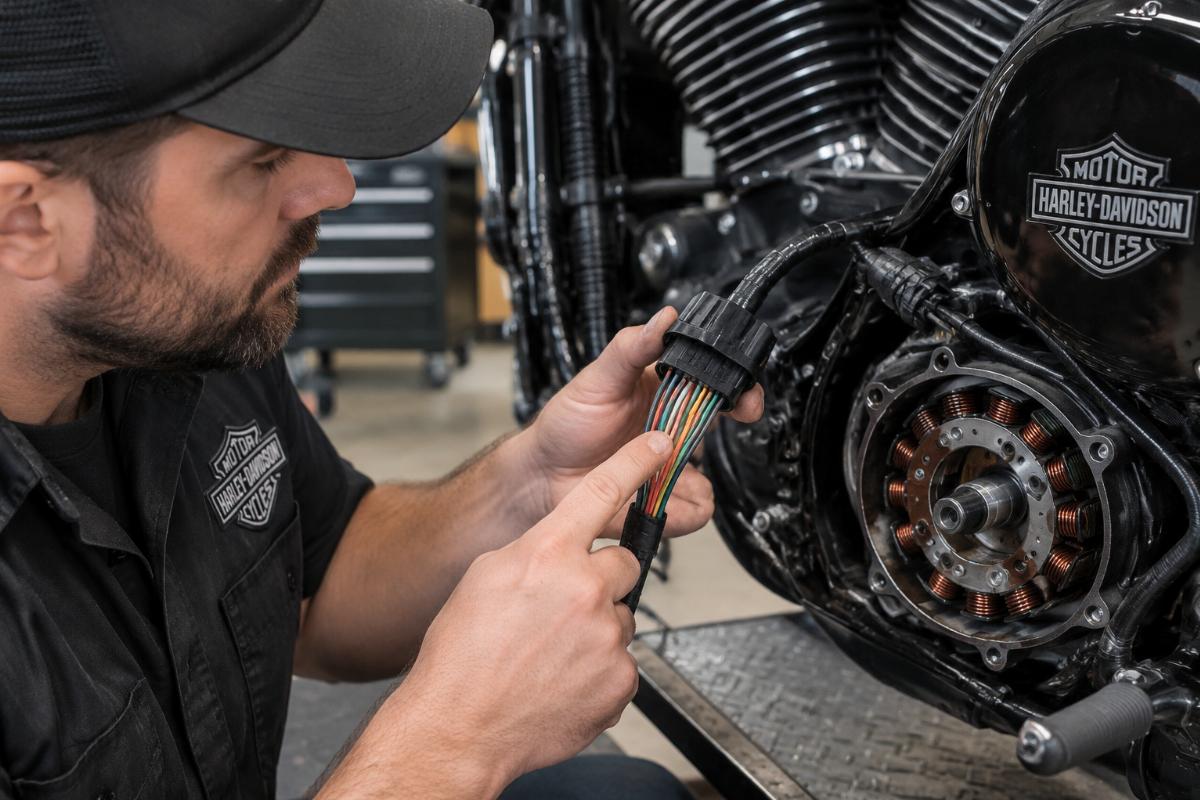
Second, examine the connector type. Take a clear photo of the regulator connector, focusing on the pin arrangement and the shape of the housing. Note whether it is a square, rectangular, or circular plug. Also, check the number of pins and their positions. Some connectors have locking tabs or specific keying features that prevent incorrect insertion. If the new regulator’s connector does not match these details exactly, it will not fit properly.
Third, confirm the model year range. Harley-Davidson made significant changes to the charging system during the transition from Evolution to Twin Cam engines, and again within the Twin Cam era. For example, early Twin Cam models may use a different regulator than late Twin Cam models, even if the engine displacement is the same. Provide the exact model year and family (Softail, Dyna, Sportster) to your supplier to ensure they cross-reference the correct specifications.
By combining these three checks, you can confidently identify the correct regulator. This process eliminates guesswork and ensures that the Harley voltage regulator fitment is accurate for your specific application.
What Are the Key Differences Between Evo and Twin Cam Regulators?
Wiring harness changes and connector definitions differ significantly between Evolution and Twin Cam eras.
The transition from Evolution to Twin Cam engines brought substantial changes to the electrical system, including the voltage regulator. While both eras use similar basic principles, the implementation details vary enough to make cross-era compatibility rare. Understanding these differences is essential for anyone sourcing parts for older or newer bikes. [NEED_CITE: technical bulletin on charging system updates between Evo and Twin Cam models]
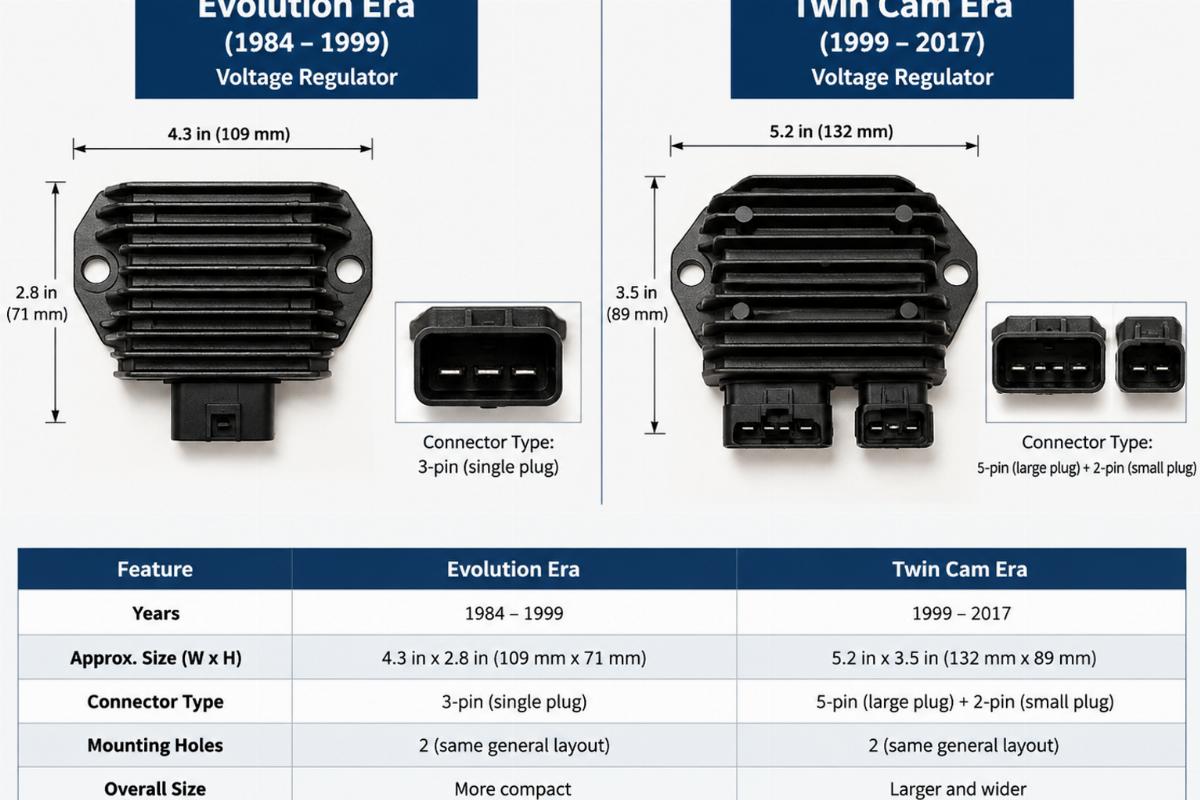
Evolution regulators typically feature a simpler design with fewer pins and a different mounting configuration. The connectors are often smaller and may use a different locking mechanism. In contrast, Twin Cam regulators are designed to handle higher output currents and may include additional sensing lines for better voltage regulation. The connectors are larger and have a different pin layout. Attempting to use an Evolution regulator on a Twin Cam bike, or vice versa, will result in a mismatch that prevents the charging system from functioning.
Additionally, the mounting points on the frame or engine case may differ. Evolution regulators often bolt directly to the frame or a bracket near the battery, while Twin Cam regulators may be integrated into the starter motor assembly or mounted in a different location. This means that even if the electrical connections could be adapted, the physical fitment would likely fail.
For custom builders or restorers working on bikes that span these eras, it is crucial to source the regulator that matches the specific engine generation. Do not assume that a regulator labeled for a “Big Twin” will fit all models. Specify whether the bike is an Evolution or Twin Cam when requesting Harley voltage regulator fitment assistance. This clarity helps suppliers provide the correct part and avoids the frustration of receiving a unit that neither fits nor functions.
Can I Use a Universal Regulator on a Custom Harley Build?
Only if the stator output and connector match exactly; otherwise, custom wiring is required.
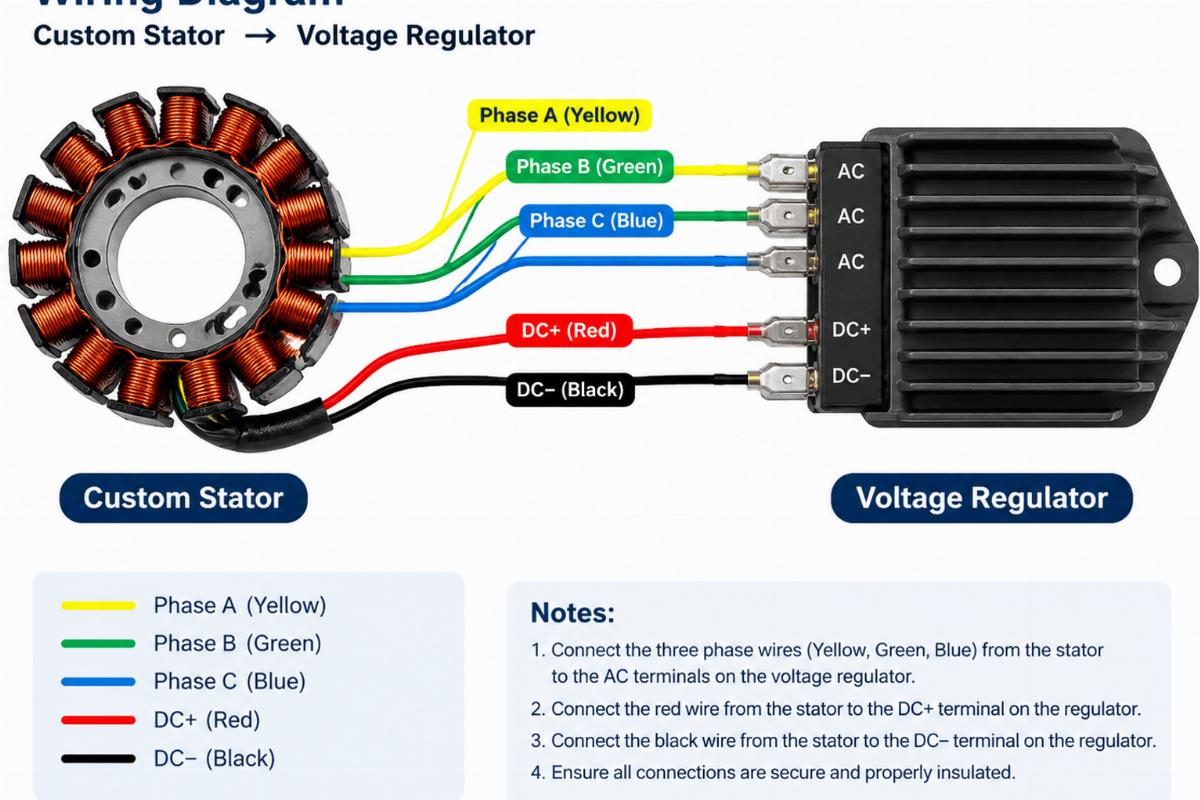
Custom Harley builds, such as choppers or bobbers based on Yamaha XS650 or older Harley frames, often present unique challenges for charging system integration. Many builders look for “universal” regulators to simplify the process. However, true universal fitment is a myth. A regulator must be matched to the specific stator it will be controlling. Using a regulator designed for a different stator phase or output capacity will lead to poor performance or failure.
For example, a builder using a Yamaha XS650 stator on a Harley frame cannot simply use a standard Harley regulator. The XS650 stator has different electrical characteristics, including phase count and voltage output. A Harley regulator designed for a three-phase stator will not work correctly with a two-phase XS650 stator. In such cases, the builder must either use a regulator specifically designed for the XS650 stator or modify the wiring harness to accommodate the differences. This requires a deep understanding of electrical systems and is not recommended for novice builders.
Similarly, when swapping stators between different Harley models, the regulator must be matched to the new stator. If you install a high-output stator from a later model on an earlier bike, you must also upgrade the regulator to handle the increased current. Failing to do so can overload the regulator and cause it to fail prematurely. Always verify the compatibility of the stator and regulator as a pair.
For custom builds, it is best to consult with a supplier who understands these nuances. Provide details about the stator source, phase count, and expected output. They can help you select a regulator that offers correct Harley voltage regulator fitment for your specific setup, or advise on the necessary wiring modifications. This proactive approach saves time and prevents electrical headaches down the road.
Conclusion
Accurate fitment prevents electrical failure and ensures reliable charging performance.
Selecting the right voltage regulator requires more than matching a part number. It demands attention to stator phase, connector type, and model year specifics. By verifying these details before purchase, distributors and repair shops can avoid costly returns and customer dissatisfaction. Proper Harley voltage regulator fitment is the foundation of a reliable charging system.